Difference between revisions of "Installation Instructions"
From GeeklogWiki
m (added a Translations headline) |
|||
| (23 intermediate revisions by 13 users not shown) | |||
| Line 1: | Line 1: | ||
= visual overview = | = visual overview = | ||
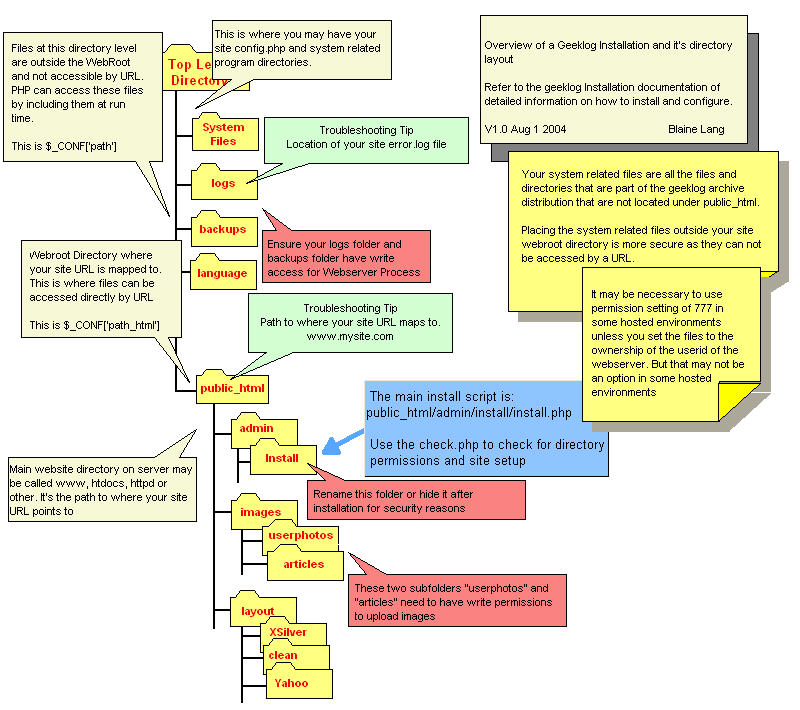
The following graphic is an overview of the geeklog installation and directory structure. You should read and review the detailed installation steps starting with the pre-installation checklist but this illustration will be helpfull in orienting you and in providing some quick tips. | The following graphic is an overview of the geeklog installation and directory structure. You should read and review the detailed installation steps starting with the pre-installation checklist but this illustration will be helpfull in orienting you and in providing some quick tips. | ||
| + | [[Image:GeeklogInstallOverview.jpg]] | ||
| Line 40: | Line 41: | ||
<li>Read the first story on your Geeklog site to learn how to log in as the administrator. Please remember to change the default passwords on all pre-configured accounts right away. | <li>Read the first story on your Geeklog site to learn how to log in as the administrator. Please remember to change the default passwords on all pre-configured accounts right away. | ||
|} | |} | ||
| + | |||
<div style="border: 1px solid #ccc; padding: 2px;"> | <div style="border: 1px solid #ccc; padding: 2px;"> | ||
== Rough Examples == | == Rough Examples == | ||
| + | |||
=== cPanel Environment with Shell Access === | === cPanel Environment with Shell Access === | ||
| + | |||
Given the instructions above, this is purely an addendum for cPanel (possibly Plesk and other) environments. Follow the instructions above and use the following steps as a reference if you get stuck. Please note, it is this authors opinion that you do not use Fantastico to setup Geeklog as it bastardizes the installation steps listed here and places config.php in your webroot (accessable to anyone). | Given the instructions above, this is purely an addendum for cPanel (possibly Plesk and other) environments. Follow the instructions above and use the following steps as a reference if you get stuck. Please note, it is this authors opinion that you do not use Fantastico to setup Geeklog as it bastardizes the installation steps listed here and places config.php in your webroot (accessable to anyone). | ||
<ul> | <ul> | ||
| Line 59: | Line 63: | ||
</ul> | </ul> | ||
</div> | </div> | ||
| + | |||
| + | |||
| + | == Translations == | ||
| + | |||
| + | The installation instructions were also translated to [http://science.webhostinggeeks.com/instaliranje-geeklog Serbo-Croatian] language by Jovana Milutinovich from Geeks Education. | ||
Latest revision as of 19:21, 15 October 2012
Contents
visual overview
The following graphic is an overview of the geeklog installation and directory structure. You should read and review the detailed installation steps starting with the pre-installation checklist but this illustration will be helpfull in orienting you and in providing some quick tips.

| INSTALLATION INSTRUCTIONS (new installation) | |
Please read this section COMPLETELY before beginning.
|
Rough Examples
cPanel Environment with Shell Access
Given the instructions above, this is purely an addendum for cPanel (possibly Plesk and other) environments. Follow the instructions above and use the following steps as a reference if you get stuck. Please note, it is this authors opinion that you do not use Fantastico to setup Geeklog as it bastardizes the installation steps listed here and places config.php in your webroot (accessable to anyone).
- After downloading and extracting the geeklog tarball under your webroot, ie. /home/yoursite/ you will have a geeklog-1.3.9sr1 folder. Copy or move the contents of this file to your home directory.
cp -R geeklog-1.3.9sr1/* .
You may now safely remove the geeklog-1.3.9sr1 folder:
rm -fr geeklog-1.3.9sr1/
- Check with your host to determine if phpSuExec is enabled. If enabled the permissions 755 should suffice. If not, you are required to use 777 for the folders listed in step 3 above.
- cPanel normally sets /home/yourwebsite/public_html/ as your webroot. People can see these files, index.php should live here.
- /home/yourwebsite/ is under the webroot, files that are not seen by the general public. Folders that live here are backups, logs, plugins, public_html and GeekLog's main config file, config.php.